6 Different Ways How to Connect to a Windows VPS
Do you have a Windows VPS or plan to get one but not so sure how to connect to it from your home computer or laptop? If your answer is yes, then you’re at the right place. Here in this guide on connecting to a Windows VPS, I am going to show you 6 different ways how you can connect to your Windows Virtual Private Server from different operating systems and in different scenarios ;
-
- Connecting to a VPS from Windows
- Connecting to a VPS from Mac OS
- Connecting to a VPS from Linux
- Connecting to a VPS from Android and iPhone
- Connecting to a VPS using TeamViewer
- Connecting to an VPS if VPN is running in the VPS
How to connect to a Windows VPS using Remote Desktop ( RDP )
When it comes to connecting a Virtual Private Server, the Remote Desktop ( RDP ) is the easiest way to connect. With the help of RDP, you can access the VPS like your personal computer. The most helpful feature of the RDP is that you can use it with any operating system such as Windows, Linux, and Mac. Have you ever used RDP? If not, don’t worry here i am going to show you how you can use RDP to connect Windows VPS. So let’s start;
Connecting to a Windows VPS from Windows
For RDP, the most popular client is RDC (remote desktop connection) which comes pre-installed on all versions of Windows. So there is no need to install any additional software on your Windows computer to connect to your VPS. So let’s see how you can connect Windows VPS from your Windows computer using RDC (Remote Desktop Connection ).
Step one: Start RDC
To start the remote desktop control on your PC, simply click on search next to the start button and type in “Remote Desktop Connection” and you will then see it listed, simply click on the ion to start it.
Alternatively you can just type “mstsc.exe” and hit enter, this will launch the remote desktop connection app
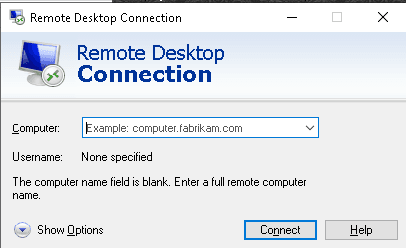
Step two: Enter the IP address and username of your VPS
Click the “Show Options” button bottom left.

Step three: Enter username and administrator password
Now Have a look at the image below and follow the numbers on the image.
- In the computer field, enter the IP address of your Windows Virtual Private Server and click connect. The IP address, username and administrator password you should have received from your VPS provider.
- Username you you should have received from your VPS provider – If you getting your VPS from Asia Virtual Solutions – then username will always be Administrator.
- Check the box that show”Allow me to save credential” This will allow you to save an shortcut icon that you can just click on next time to connect. If you do not check this you will need to fill in the details each time you want to connect.
- Once you have completed steps 1 -3 above, you can click on “Save As” Browse to the location you want to save it at. You can name it anything you want, for example “Asia Virtual Solutions VPS
- Now you can finally hit that “Connect” button
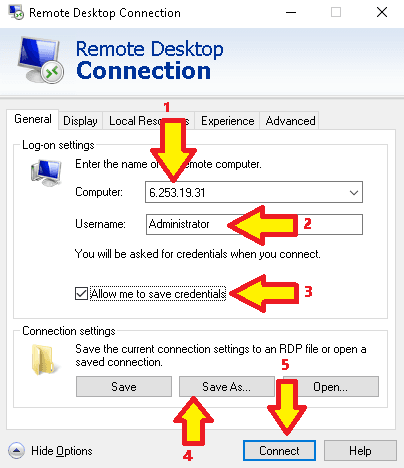
Once you have saved the Windows Remote Desktop settings, you can now click on the Connect Button.
When you click the connect button you will see the below small windows will open, this is where you now need to enter your administrator password.
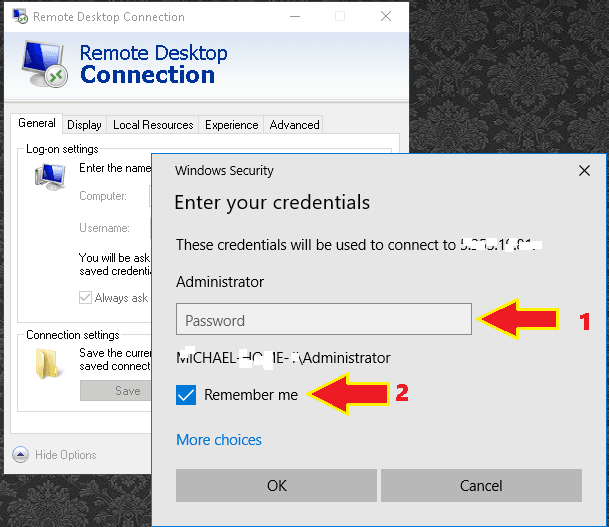
- Fill in the password which you would have received from the hosting company.
- Check the box that says “Remember me”, if you do not check that box then it is going to ask you for the password every single time when you want to connect to your Windows VPS
After you have now added the password and checked that “remember me” box, you can then just click OK to connect.
The first time you connect you might get some warning message that pop up warning about connecting to the computer – You don’t need to worry about this message. Just double-check the “don’t ask me again for connections to this computer” and click yes. After clicking “yes” your remote desktop will appear.
Congratulation! You have successfully connected to your VPS from your windows computer. Now you can use this Windows server like another computer. If you close this window, your VPS will remain online. Even if you disconnect it or shut down your computer, your virtual private server will remain online.
Connecting Windows VPS from Mac OS
To connect Windows VPS from Mac OS, you can use the Microsoft remote desktop application. So let’s see how you can connect to the server from the Mac OS.
Step one: Install the Microsoft remote desktop connection.
For installing Microsoft remote desktop software, open the App Store and type “Microsoft remote desktop” in the search box. Then install it.

Step two: Open the Microsoft remote desktop application
After installing the Microsoft remote desktop on your Mac computer open the software. When you open the “Microsoft remote desktop,” it will show the below screen:

Step three: Create a new connection.
To create a new connection click on the “new” then it will show you the following screenshot;
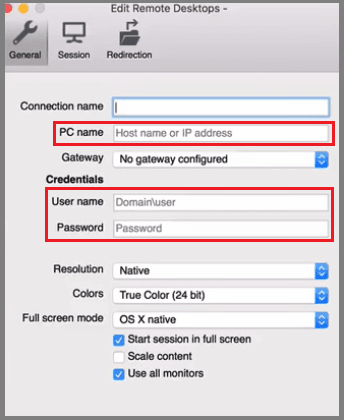
Now in the PC name section type the IP address of your VPS. And in the username and administrator password section type the username and password given by your VPS provider. You can use any name of your choice in the connection name section(here i am using ‘test’ as my connection name). After typing the IP address, the connection name, username, and password close this window. After closing the window, you will see something like this:
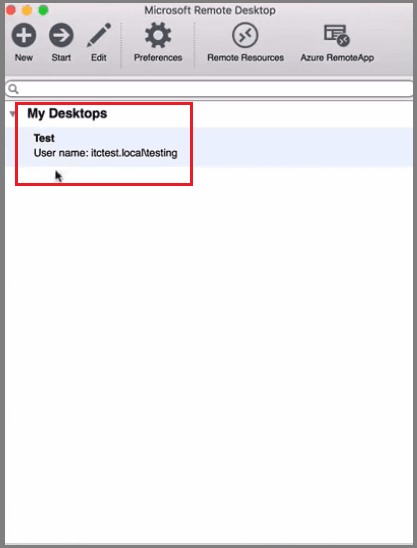
Step four: Launch the VPS
To launch the VPS, select the connection name and click start or you can double click on the connection name. After clicking start, you will see the below warning message:

As i said before you don’t need to worry about connection certificate message, click on continue and your Windows VPS will appear in front of your eyes. Finally, you have successfully connected to your Windows VPS from Mac OS. Isn’t it so simple?
Connecting Windows VPS from Linux
There are several RDP client for Linux distribution, but the most popular one is “rdesktop.” To connect Windows VPS from Linux, you need to install the “rdesktop” on your Linux machine. Here is the source for installing “rdesktop” on your Linux machine. Here is how it looks when you open the “rdesktop” on your Linux machine:

Like other operating systems you’ll need to type the username and password to connect Windows VPS(the process of connecting to the Windows VPS from Linux is the same as Windows and Mac OS ).
Connecting Windows VPS from Android and iPhone
For connecting Windows VPS from Android, you can use the remote desktop client such as “Splashtop Personal – Remote Desktop” or “Microsoft Remote Desktop.” On the other hand, to connect your Windows VPS from iPhone, you can use the remote desktop client such as “Screens.” The username and password will be the same as above.
How to connect to a Windows VPS using TeamViewer
Above I discussed how you can connect your Windows VPS using RDP, but what if your RDP became slow or a VPN installed on your VPS? In this case, you have to use Team Viewer to connect VPS from your computer. So let’s discuss how you can connect Windows VPS through Team Viewer.
Step one: Install Team Viewer on your machine.
Installing TeamViewer is just like drinking water. You can download TeamViewer from here. After downloading the TeamViewer, install it. Here is how it looks like when you open TeamViewer on your computer:

Step two: Connect to your VPS using remote desktop connection and install TeamViewer host on the VPS.
Use the remote desktop connection to connect VPS from your machine and install TeamViewer host on the VPS. You can download TeamViewer host from here. To install TeamViewer host on your VPS, follow these instructions:
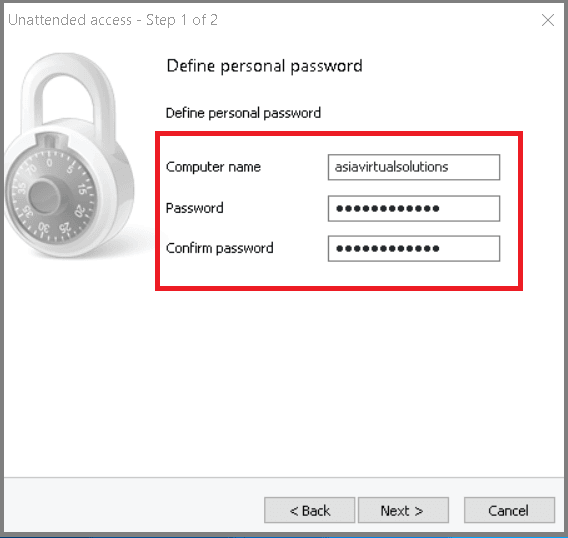


To access the VPS from your computer, use the above ID and password that you created. Isn’t it so cool? Personally, I like to connect VPS through TeamViewer over RDP because it works faster than RDP. You can use RDP or TeamViewer; it’s up to you.
How to connect to a Windows VPS if a VPN running in the VPS
Do you know what happens when you connect a VPN on your Windows VPS? The IP address of the VPS changed, which means you’ll be disconnected from the RDP. In this situation, you’ll have to access the VPS through TeamViewer. What if you can’t access the VPS also through the TeamViewer? Don’t worry. Still, you have a way to access your VPS. So let’s discuss how you can connect to a VPS if an VPN is running inside it;
Step one: Go to the www.noip.com and click signup.
Step two: Fill-up the required information. Here is the form;

Step three: Check your email and click the activation link to activate the free account.
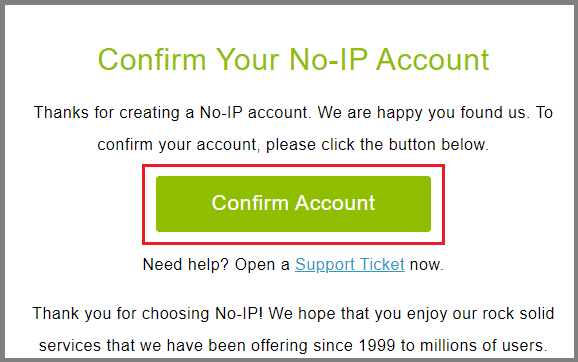
Step four: Download the dynamic DNS client. You’ll be directly sent to the download page when you click the account activation link. You can also download the dynamic DNS client form here. After that, install it on your VPS.

Now login and click on edit host.
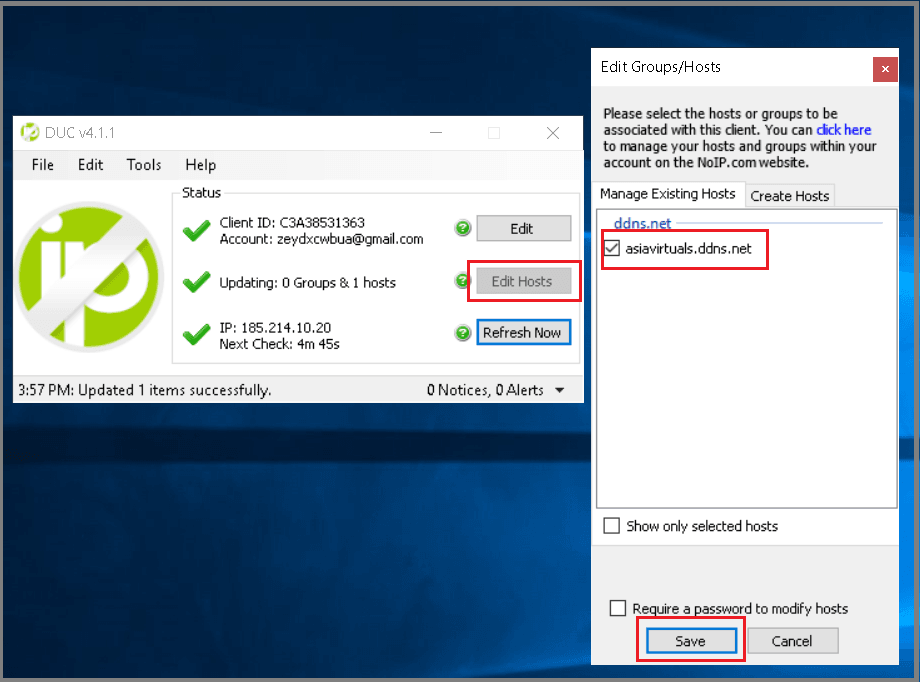
Step five: After installation and configuration:

To check the host-name working or not, you can put it directly on your RDP client application.
Step six: When you've confirmed that your dynamic DNS is working correctly, then you switch on your VPN.
Final words
In this guide of different ways to connect Windows VPS, i have discussed three ways to connect the Windows VPS. Which is your favourite way of connecting Windows VPS? Let me know about that in the comment box below. Moreover, if you’re still facing difficulties to connect your Windows VPS, don’t forget to let me know about that.


